A professional hardwired motion sensor light installation usually runs $350 to $500, with an average around $425, and that price typically covers the fixture, labor, and the materials needed to get the job done safely and to code (installation cost details). That gives most Northern Utah homeowners a realistic starting budget before a ladder comes out or a fixture gets ordered.
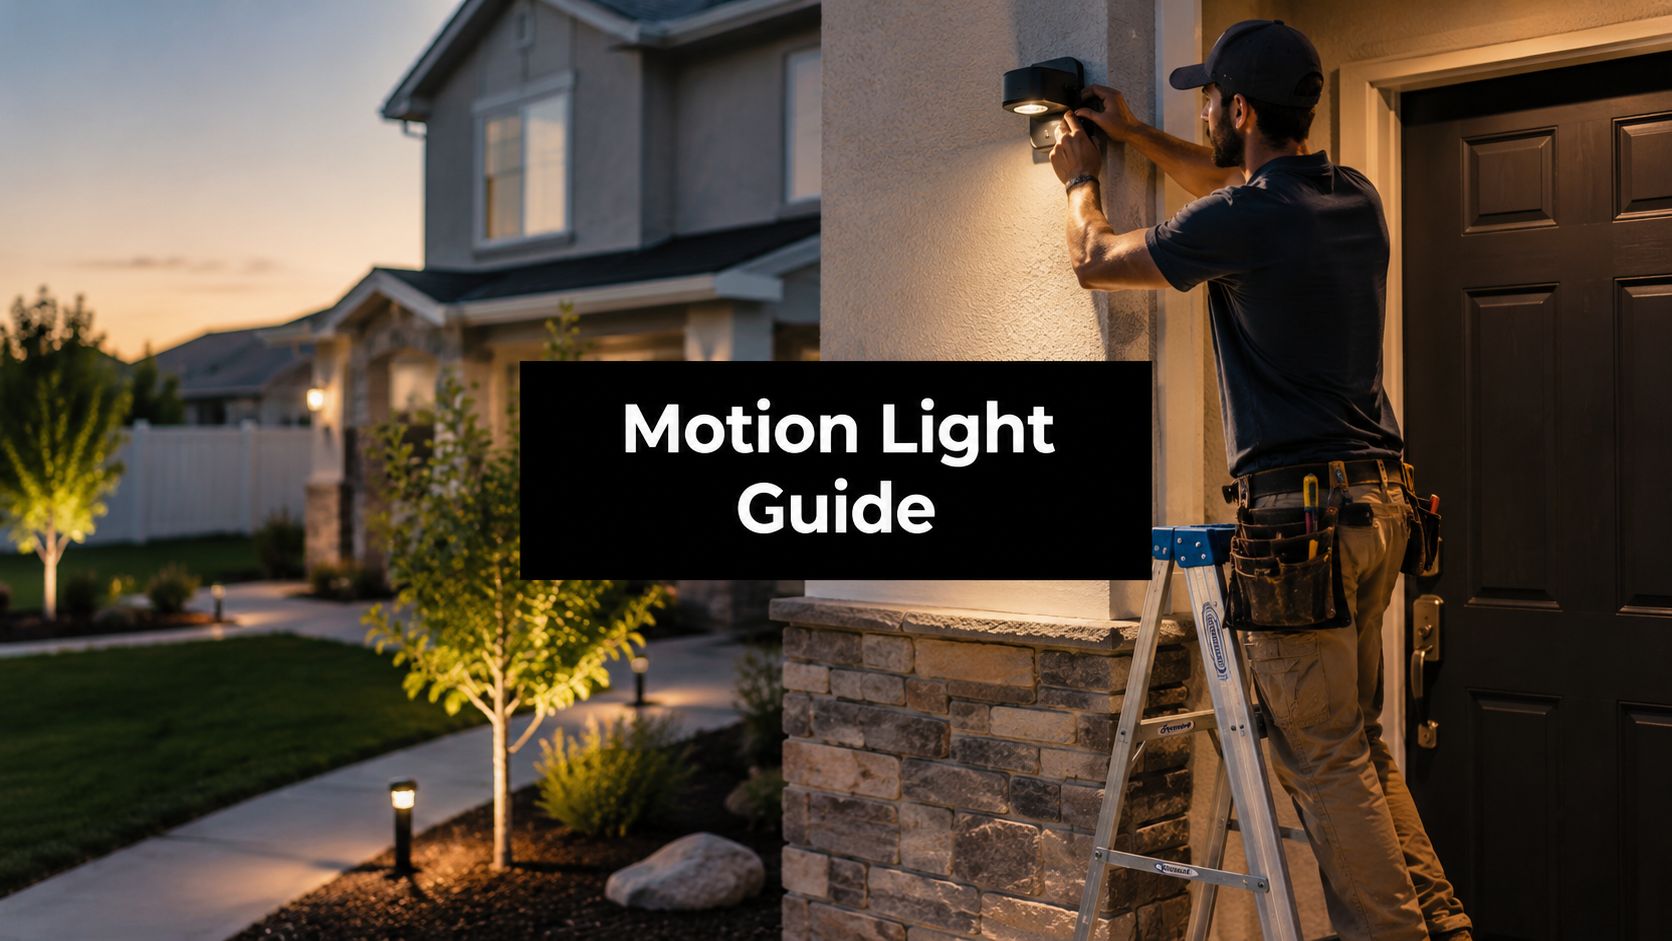
A common trigger for considering motion sensor light installation is the experience of pulling into a dark driveway, fumbling at the front door, or dealing with an unreliable light. A good setup fixes that. A bad one turns into nuisance trips, wet wiring, and a light that flashes at every cat in the neighborhood.
Contents
- 1 Planning Your Motion Sensor Light Project
- 2 Essential Tools and Safety for Simple Installations
- 3 How to Install Battery and Plug-In Motion Lights
- 4 Hardwired Installation What a Pro Electrician Does
- 5 Troubleshooting Common Motion Sensor Light Issues
- 6 Installation Costs and When to Call an Electrician
Planning Your Motion Sensor Light Project
You notice the problem at the worst time. You pull in after dark, the porch stays black, and the side yard disappears into shadow. That is the right time to slow down and plan the light before buying one, because the wrong fixture in the wrong spot creates more annoyance than security.
The first choice is the power source. That decision usually matters more than the brand or the shape of the fixture.
For some homes, a battery unit is enough. It fits spots where you want light but do not have an electrical box nearby, like a gate, shed, or fence corner. A plug-in model works well near an outdoor receptacle, especially on a patio or covered porch. A hardwired floodlight usually makes the most sense at the front door, over the garage, or anywhere you need reliable operation in snow, rain, and freezing temperatures.
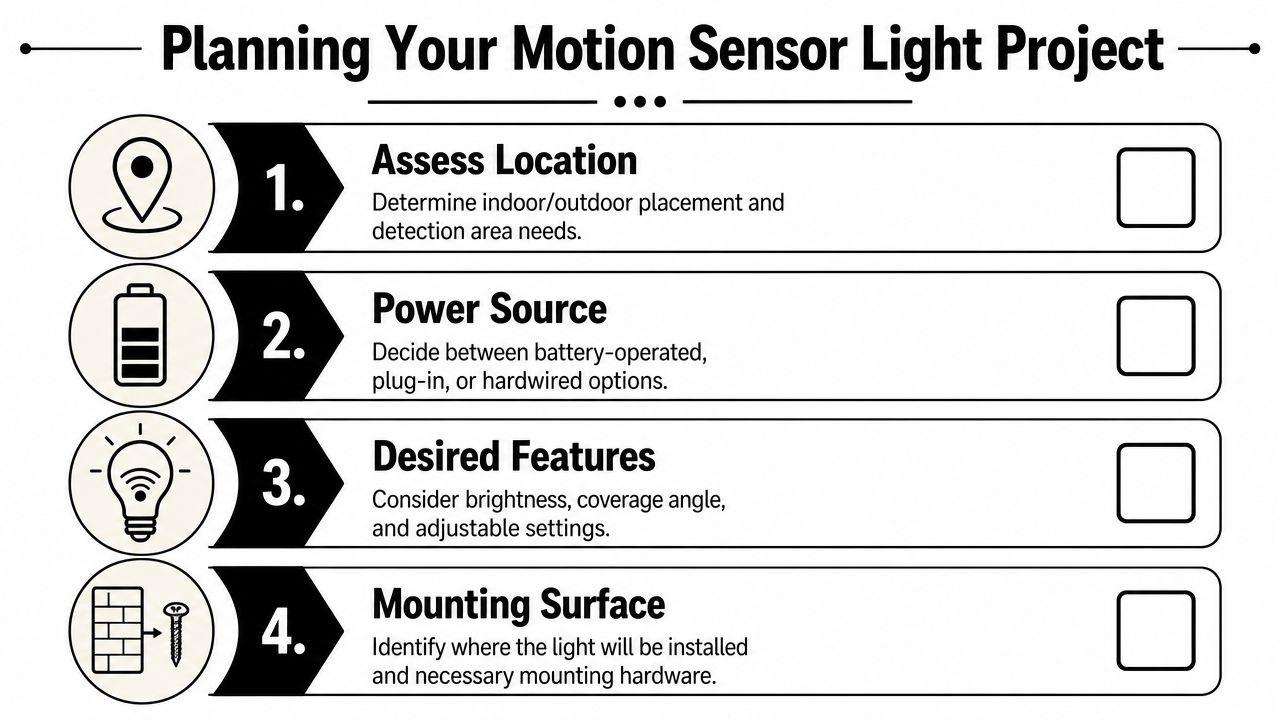
Choose the light based on the location
Match the fixture to the job.
| Project area | What usually works | Main trade-off |
|---|---|---|
| Shed or fence line | Battery-powered light | Fast install, but batteries need regular attention |
| Patio or deck near an outlet | Plug-in light | Simple setup, but the cord has to be routed safely |
| Front door or garage | Hardwired fixture | Reliable long-term, but tied to house wiring |
| Driveway coverage | Hardwired floodlight | Better reach and output, with more planning and electrical work |
Cost still matters, but planning should start with reliability, weather exposure, and whether the light protects a primary entry. A cheap light over a main door often turns into a replacement job after one rough winter.
Place the sensor where motion actually happens
A motion sensor works best when it watches the path people use. Aim it at the porch steps, the walkway to the door, the gate latch, the garage apron, or the stretch between the driveway and the entry.
Mounting height matters too. General installation guidance from an outdoor lighting installer notes that motion sensors are commonly mounted about 6 to 10 feet above grade for a better field of view and fewer nuisance trips from small animals or low shrubs (mounting guidance). Too low, and bushes, trash cans, or snow piles can block the sensor. Too high, and it may miss someone walking right up to the door.
A simple rule works well here. Keep the sensor looking across the line of travel, not straight at it. Side-to-side motion is easier for many sensors to catch than someone walking directly toward the fixture.
Do not point the sensor at a busy street, a neighbor's driveway, or tree branches that move every time the wind picks up. Northern Utah weather can make a poorly aimed light chatter on and off all night.
If you are planning lights as part of a broader safety upgrade, this guide to residential security system setup can help you map camera and lighting coverage together so one does not interfere with the other.
Older homes need extra caution. If the project involves an exterior box, uncertain wiring, missing weather protection, or questions about code, call a licensed electrician in Northern Utah. That is the point where a simple lighting upgrade becomes electrical work, and getting it right protects both the house and the people living in it.
Essential Tools and Safety for Simple Installations
A clear distinction is important. Battery and plug-in lights can be a reasonable DIY job. Hardwired lights are a different category.
If the project involves opening an electrical box, identifying conductors, replacing a fixture connected to house wiring, or dealing with a breaker, it's no longer a simple install. That's electrical work.
What's reasonable for a non-wired install
For battery-operated or plug-in models, the basic tool list is usually short:
- Drill and bits: For pilot holes in wood, siding, or masonry anchors where needed.
- Screwdriver: To secure the mounting plate or housing.
- Level: To keep the fixture straight so the sensor points where it should.
- Ladder: Sturdy, placed on stable ground.
- Safety glasses: Especially when drilling overhead or into masonry.
Safety habits that matter
A simple mounting project can still go sideways fast if it's rushed.
- Check the surface first: Rotten trim, loose siding, or cracked masonry won't hold a fixture well.
- Watch the ladder setup: Most outdoor falls happen before the first screw is installed.
- Keep cords controlled: With plug-in units, don't leave cords pinched under doors or stretched across walkways.
- Stay out of live wiring: If a fixture location has existing house wiring behind it, stop there.
If there's any doubt whether the box or cable behind a light location is energized, that's the point to hand it off.
The safest DIY motion light is the one that never crosses into live electrical work.
How to Install Battery and Plug-In Motion Lights
Battery and plug-in models are the cleanest way to add light without touching household wiring. That's why they're a good fit for decks, side yards, sheds, and under-eave spots where a little extra light solves a real problem.
These instructions don't involve opening electrical boxes or making wiring connections.
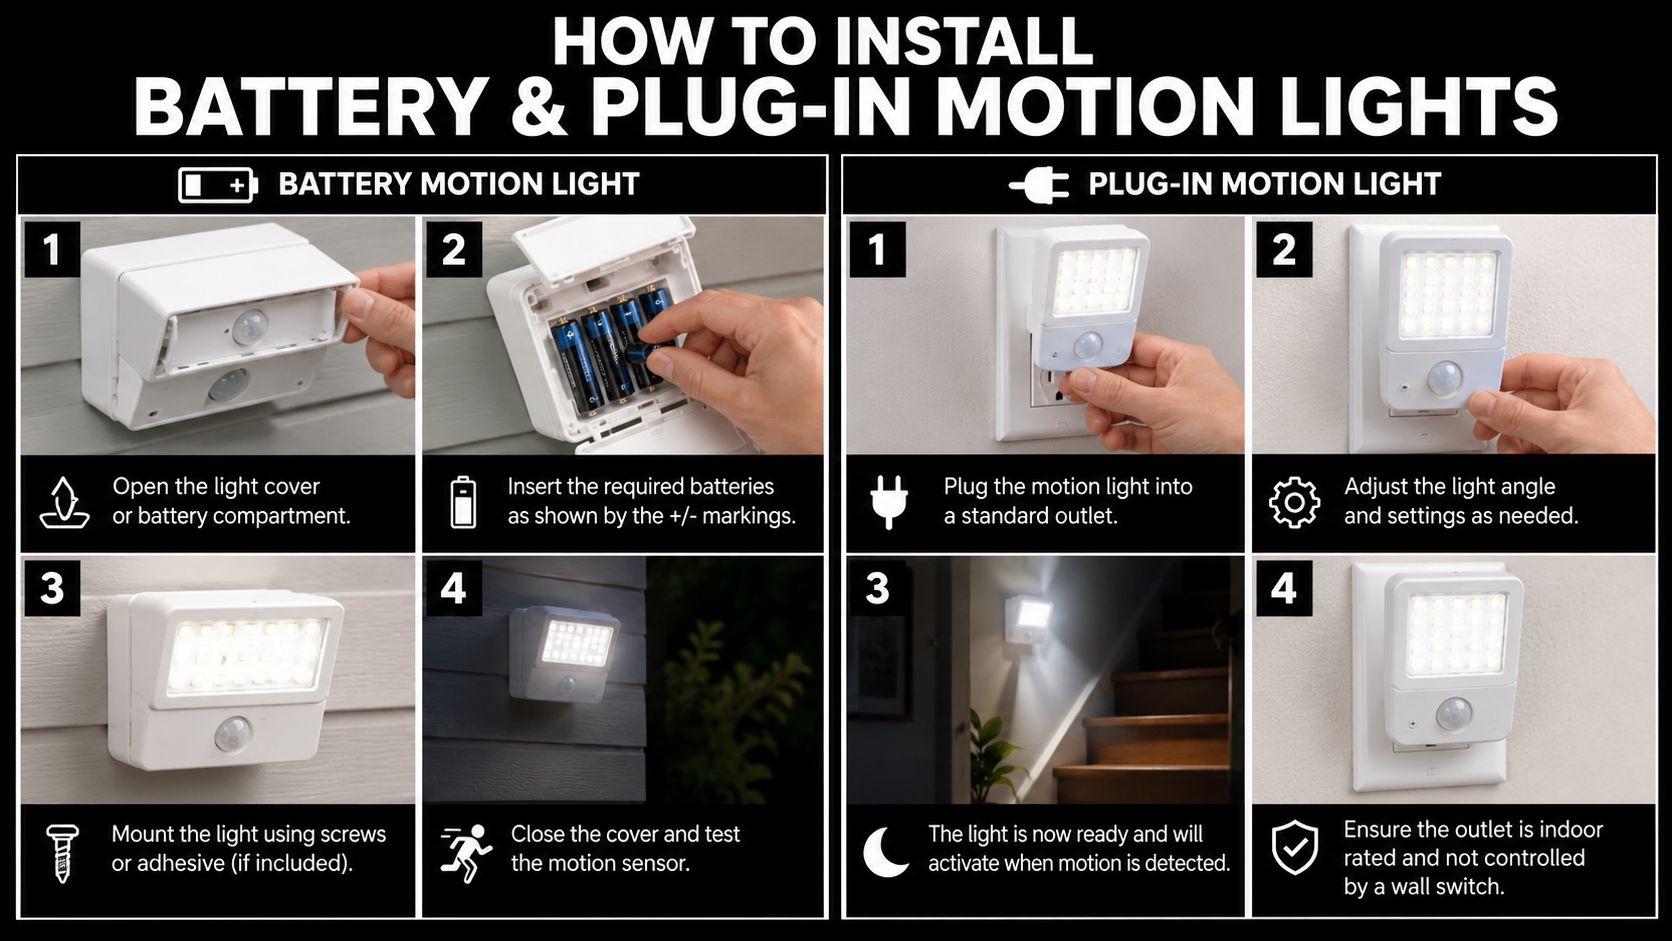
A safe installation sequence
- Confirm the mounting surface. Make sure the wall, post, trim, or masonry is solid enough to hold the fixture.
- Mark the position. Hold the base in place, level it, and mark the screw holes.
- Install anchors if needed. Wood may only need pilot holes. Masonry or stucco usually needs the right anchors for the surface.
- Mount the fixture securely. The light shouldn't wobble or twist when touched.
- Add the power source. Insert batteries or route the plug neatly to a nearby GFCI-protected outlet.
- Test the sensor. Walk through the target zone and adjust the angle and settings so the light responds to real approach paths.
What usually causes trouble
The common mistakes are simple ones. The fixture gets mounted too high, the sensor faces open street traffic, or the plug-in cord ends up where water and wear become a problem.
A homeowner looking for actual house-wiring work should skip generic online diagrams and use professional help. Even basic-looking electrical wiring instructions can show how quickly a “simple light project” turns into real electrical scope.
A battery or plug-in light should feel like mounting hardware, not electrical troubleshooting. If it stops feeling simple, it probably isn't.
Hardwired Installation What a Pro Electrician Does
A hardwired motion light may look like a straightforward swap. In the field, it rarely is. Exterior boxes fill with moisture, old gaskets fail, wire insulation gets brittle, and past repairs don't always match what's behind the fixture.
That's where professional motion sensor light installation earns its keep.
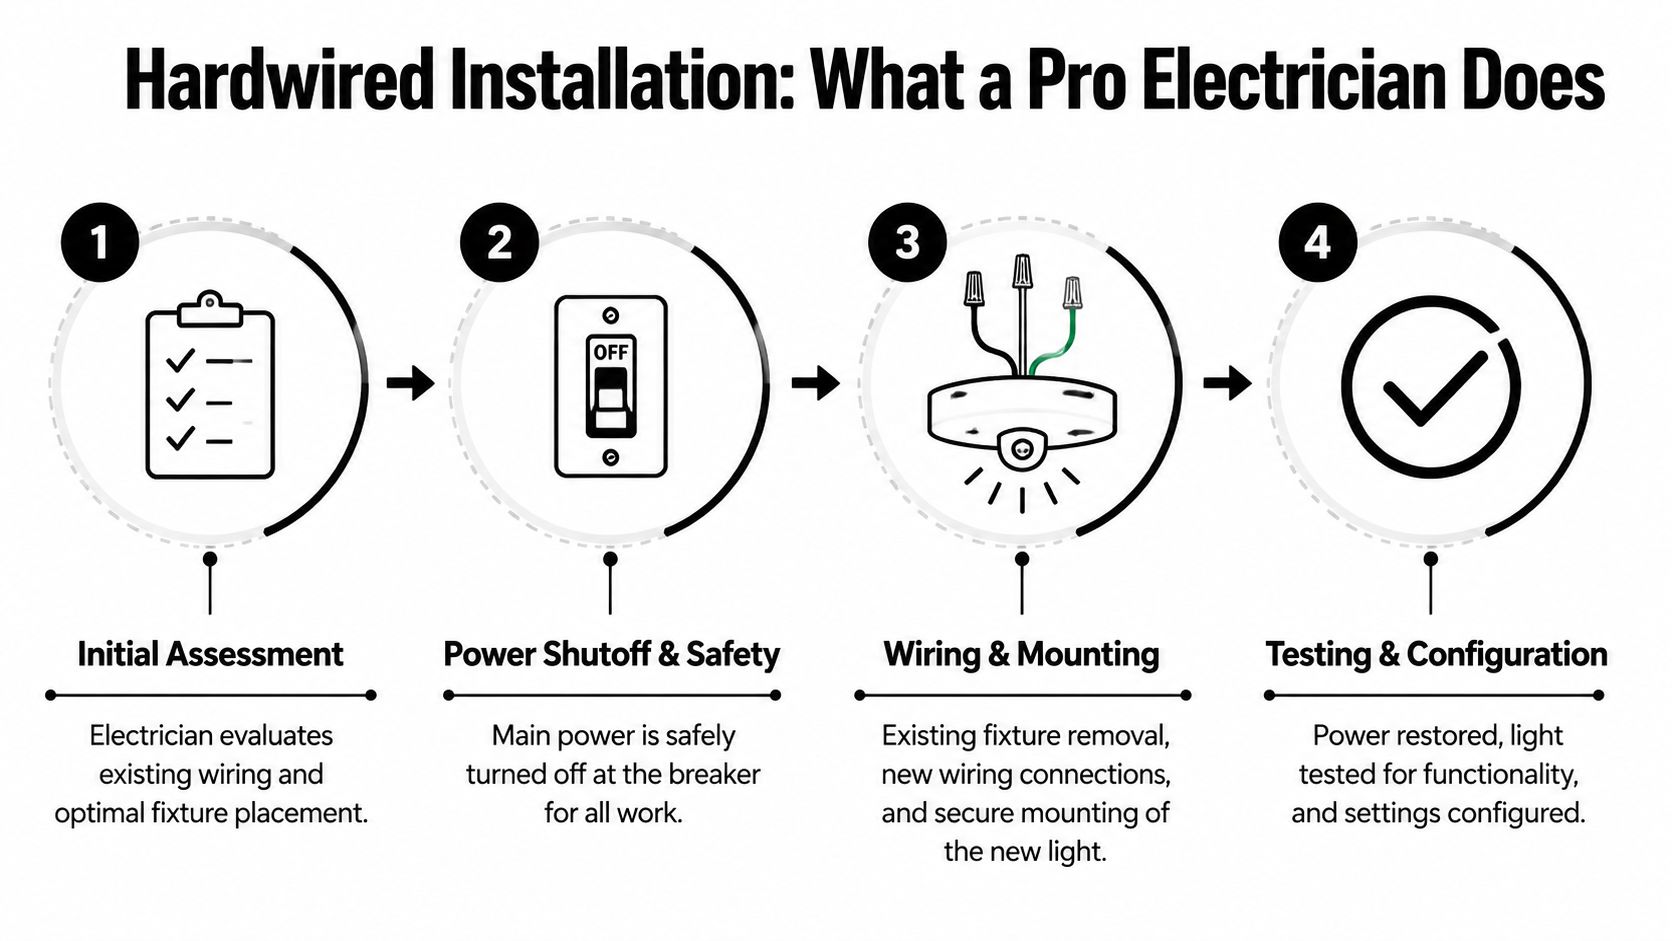
What gets checked before the new light goes up
The first step isn't mounting the fixture. It's evaluating the circuit and the location.
An electrician verifies the circuit is safely de-energized, confirms the existing box is suitable for exterior use, checks conductor condition, and looks for signs of water entry. If the light is being added where no proper box exists, that issue gets corrected first. On brick or stucco, sealing matters because water intrusion at the box is one of the most common reasons exterior fixtures fail.
A useful homeowner reference for understanding how quickly simple-looking fixture work connects to branch-circuit issues is this 120V outlet wiring guide. It's a reminder that device replacement and actual circuit work aren't the same thing.
Why code and weather protection matter
In Northern Utah, including Weber, Davis, and Salt Lake counties, exterior lighting installations must comply with local utility requirements that call for a dedicated 15-amp breaker and GFCI protection for sensor-activated circuits in wet locations (local utility requirements). That isn't paperwork for its own sake. It's what helps protect people and property when snow, rain, and freeze-thaw conditions put outdoor equipment to the test.
A licensed electrician also checks whether the mounting height and sensor orientation suit the location, whether the box is properly supported, and whether the fixture base is weather-sealed against the wall surface.
What happens during the actual install
The visible part of the job is short. The important part is everything around it.
- Circuit isolation: Power is shut off and verified before any conductors are handled.
- Fixture removal: The old assembly comes down without damaging the box or existing conductors.
- Box and seal review: If the box, gasket, or mounting surface won't keep water out, that gets fixed before the light goes on.
- Connection and mounting: The new fixture is wired, secured, leveled, and adjusted for the intended detection path.
- Testing: Power is restored, sensor settings are configured, and the light is tested at the site.
Outdoor lighting failures usually start with one of two things: water where it shouldn't be, or wiring that was never right to begin with.
For homeowners who want a contractor to handle that scope, motion sensor light installation is part of Black Rhino Electric's residential lighting work in Northern Utah.
Troubleshooting Common Motion Sensor Light Issues
Most motion light problems fall into two groups. The light works, but badly. Or the light behaves like there's a deeper electrical issue behind it.
The first group can often be checked safely by a homeowner. The second needs a technician.
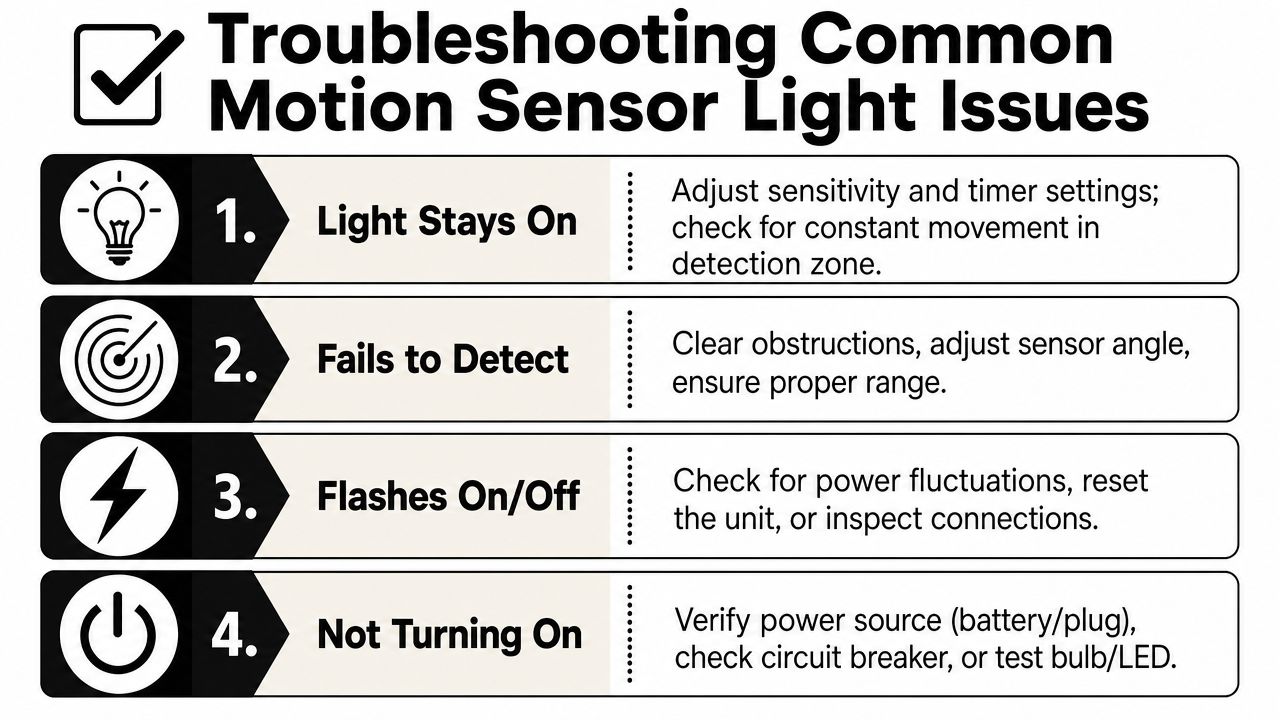
Safe checks a homeowner can make
Start with the simple things first:
- Clean the sensor lens: Dirt, spider webs, and dust can interfere with detection.
- Trim the detection zone: Branches, tall plants, flags, and decorations can trigger repeated activation.
- Adjust sensitivity: Too much sensitivity makes the light react to minor movement.
- Shorten or reset the timer: A long run time can make it seem like the light never shuts off.
- Check batteries or the plug connection: With non-hardwired models, weak batteries and loose plugs are common culprits.
If the sensor has been aimed straight at a driveway entrance or street, a small angle change can make a big difference.
Wildlife and pet triggers are real
This problem gets dismissed too often, especially in suburban and semi-rural parts of Northern Utah. Over 40% of motion sensor complaints come from animal-triggered false activations, and more effective fixes often involve directional shielding or mounting adjustments rather than only turning sensitivity down (false activation guidance).
That matters in neighborhoods where cats, raccoons, birds, and small wildlife move through the yard at night.
A few practical corrections usually help:
- Raise or refine the angle: Keep the sensor focused on human approach paths instead of low ground movement.
- Narrow the field of view: Shielding can block problem areas without sacrificing the doorway or walkway.
- Avoid heat and reflective surfaces: Some fixtures react poorly when aimed near surfaces that create inconsistent readings.
A motion light that catches every squirrel isn't “sensitive.” It's mis-aimed.
Signs the issue is electrical, not setup
Call for service if the light flickers, buzzes, trips a breaker, works intermittently with no clear pattern, or fails after rain or snow. Those symptoms can point to a loose connection, moisture intrusion, a failing device, or a circuit issue that won't be solved by changing the timer dial.
When that happens, the right next step is electrical troubleshooting rather than more guesswork.
Installation Costs and When to Call an Electrician
A motion light can be a twenty-minute upgrade or a half-day electrical repair. The price changes fast once the fixture is tied into house wiring, mounted on brick or stucco, or installed where weather has already started damaging the box.
For battery and plug-in models, cost is usually straightforward. You are paying for the light, the mounting hardware, and your time. Hardwired work is different. The final price depends on whether the job is a simple fixture swap at a sound, code-compliant box, or a larger repair that includes replacing a weatherproof box, correcting bad splices, adding support, or tracing a circuit problem.
That is why two homes can get very different estimates for what sounds like the same project.
When calling an electrician makes sense
Bring in a licensed electrician if any part of the job involves permanent house wiring, a new exterior box, panel capacity questions, or signs of moisture inside the fixture or wall. Those are the situations where the risk is not just a light that works poorly. It is shock hazard, nuisance tripping, hidden water damage, or a connection that overheats later.
Older Northern Utah homes deserve extra caution. I see plenty of exterior light replacements that turn into repair work once the fixture comes down. Loose boxes, brittle conductors, missing grounding, and old patch jobs are common. Snow, wind, and freeze-thaw cycles are hard on exterior connections, so a light that looks like a simple swap from the ground may not be simple once it is open.
Call for professional help if you run into any of these:
- A hardwired fixture is being replaced
- A new light location needs cable, a box, or a switch leg
- The breaker trips or the circuit behavior is inconsistent
- The existing box is loose, rusted, shallow, or not rated for wet locations
- There is caulk failure, corrosion, or evidence of past leaks
- The home has older wiring or mixed repair work from different eras
When DIY is still reasonable
DIY usually stays in the safe zone with battery-powered lights and plug-in units that use a proper outdoor receptacle. The mounting surface needs to be solid, the cord cannot create a trip hazard or run where it can be damaged, and no one should be opening junction boxes or working on energized conductors.
A good rule is simple. If the project stops at mounting, aiming, and adjusting settings, many homeowners can handle it. If the project reaches into the wall, the box, or the breaker panel, the job changes.
In Weber County, Davis County, and Salt Lake County, a lot of service calls start with a light that "just needed replacing." Then the old box is loose, the wiring is short, or water has been getting in for years. Labor covers more than time on a ladder. It covers diagnosis, safe repair, and making sure the new light does not become the next electrical problem on the house.
If you want pricing based on your home and the actual condition of the existing wiring, request a free electrical quote.