Is your ceiling fan suddenly stuck on one speed or refusing to turn on at all? Before you start shopping for a brand-new fixture, it’s worth investigating if a faulty switch is the real culprit. A proper ceiling fan repair switch diagnosis can often save you a significant amount of money and hassle.
Contents
Is Your Ceiling Fan Switch Really the Problem?
You give the pull chain a tug, and… crickets. Or maybe you can only get high speed, no matter how many times you pull. Is it time to replace the whole fan? Probably not.
Honestly, the little pull-chain switch is one of the most common parts to fail, but a few other simple issues can look exactly the same. Let’s do some detective work and rule out the easy stuff before you get the tools out.

Start with the Obvious Checks
It sounds almost too simple, but you’d be surprised how often the fix is just a flipped switch away. Before you even touch the fan, check these two things:
- The Circuit Breaker: Head over to your electrical panel and see if the breaker for that room has tripped. A tripped breaker usually sits in the middle position. Flip it all the way to "off" and then back to "on."
- The Wall Switch: If your fan has a wall switch, make sure it’s on. It’s easy for it to get bumped or turned off by mistake, which cuts all power to the fan.
If both of those are good to go, then the problem is somewhere inside the fan itself.
Differentiating Between Common Culprits
When a ceiling fan gets finicky, the pull-chain switch isn’t the only potential culprit. It’s a frequent offender, sure—those little mechanical parts wear out from all the pulling and clicking.
In fact, with the global ceiling fan repair market valued at USD 2.56 billion and projected to hit USD 3.89 billion by 2033, switch replacements are a big piece of the pie. They account for an estimated 20-25% of all service calls simply because they take a lot of mechanical abuse. You can find more details on this trend over at Verified Market Reports.
This just goes to show how common your problem is. To help you zero in on what’s actually wrong with your fan, I've put together a quick diagnosis table.
Quick Diagnosis: Common Fan Problems and Their Causes
Use this table to match your fan's symptoms with the most likely faulty component. It’s the fastest way to pinpoint where to look first.
| Symptom | Most Likely Cause | What to Check First |
|---|---|---|
| Fan is completely dead | No power or faulty switch | Circuit breaker, wall switch, pull chain |
| Stuck on one speed | Faulty 3-speed switch | Pull the chain—do you hear or feel a "click"? |
| Light works but fan doesn't | Bad fan switch or motor capacitor | Test the light switch first, then the fan switch |
| Remote doesn't work | Remote/receiver issue | Check the batteries, then try cycling power to the fan |
| Fan hums but won't spin | Bad motor capacitor | Listen for a humming sound when power is on |
By working through these possibilities one by one, you can avoid the frustration of replacing a part that wasn’t even broken.
If you’ve gone through these basics and think you're dealing with something more complex than just a simple switch, our guide on electrical troubleshooting can give you some more advanced pointers.
Getting the Right Tools and Replacement Switch
Ready to tackle this ceiling fan repair switch project yourself? A little prep work is what separates a frustrating afternoon from a smooth, safe DIY win. Let me explain what you'll actually need to get this done right—from the tools you probably already have to the exact replacement part.
Before you even grab the ladder, the first move is to gather your tools. Having everything at arm's reach means you aren't climbing up and down a dozen times, which makes the whole job go a lot faster. You don't need a pro-level workshop for this, just a few key items.
You know what? Most of this stuff is probably already in your junk drawer or toolbox. We're talking about your basic Phillips and flat-head screwdrivers, a pair of wire strippers, and some needle-nose pliers for grabbing those tiny wires.
But there’s one tool that's absolutely not optional.
Crucial Safety Tool: A non-contact voltage tester is a non-negotiable must-have. This little pen-sized gadget lets you confirm the power is 100% off before you touch a single wire. It’s a cheap tool that buys you priceless peace of mind and prevents a nasty shock.
Your Essential Tool Checklist
Here’s a quick rundown of everything you should have laid out before you begin. This simple checklist will keep you from scrambling for a tool mid-repair.
- Screwdrivers: You'll almost certainly need both a Phillips and a flat-head to get the light kit or switch housing off.
- Wire Strippers/Cutters: These are essential for stripping wire insulation cleanly so you get a solid, safe connection.
- Pliers: Needle-nose pliers are a lifesaver for maneuvering wires around in those tight spaces.
- Non-Contact Voltage Tester: I'll say it again—this is your most important tool. It confirms the power is off at the fan.
- Ladder or Sturdy Step Stool: Make sure it’s tall enough. You want to be able to work comfortably without stretching and losing your balance.
- Wire Nuts: It never hurts to have a few extras. The old ones can get brittle and crack when you remove them.
- Your Smartphone: Pro tip—snap a clear picture of the wiring before you disconnect anything. This simple step has saved me from major headaches more times than I can count.
With your tools ready, the next mission is to track down the correct replacement switch. This is where a lot of DIY repairs go sideways.
How to Choose the Right Replacement Switch
Grabbing the wrong switch is a common mistake, and it can cause real problems, from wonky fan speeds to burning out the motor. Why does it matter so much? Ceiling fan motors are built to work with specific electrical loads, and that little pull-chain switch is in charge of managing it all.
To find an exact match, you’ve got to get a look at the old switch. After you’ve killed the power, carefully remove it from the fan and inspect the plastic or metal casing for any markings.
You're looking for a model number and, more importantly, a sequence like "L-1-2-3" printed on the side. Here’s the thing: this code is the map for how the switch directs power. "L" is the "line" or hot wire coming in, and the numbers correspond to the fan speeds (like 1 for high, 2 for medium, and 3 for low).
The number of wires coming out of the switch is your other big clue. A standard 3-speed fan switch will almost always have four wires. Your goal is to find a replacement with the same number of wires and the exact same terminal layout.
Where to Find a New Ceiling Fan Switch
Once you know the specs of your old part, finding a new one is pretty straightforward. Here are the best places to check.
| Retailer Type | Pros | Cons |
|---|---|---|
| Big-Box Home Improvement Stores | Easy to find, simple returns | Selection can be limited for specific models |
| Local Hardware Stores | Staff can be incredibly helpful with matching parts | Might not have less common switches in stock |
| Online Electrical Supply Retailers | Massive selection, best for finding an exact match | You have to wait for shipping; returns can be a pain |
| Fan Manufacturer's Website | Guaranteed to be the right part | Often more expensive; parts can be backordered |
Taking a few extra minutes to find the exact replacement for your ceiling fan repair switch is the most critical part of this prep work. It’s not just about making the job easier; it’s about doing it safely and correctly so your fan runs like new for years to come.
Replacing a Ceiling Fan Pull Chain Switch
Alright, you’ve got the new switch in hand and your tools are laid out. It's time to get this done. When it comes to any electrical work, a safe, methodical process isn't just a good idea—it's everything.
We'll start with the single most important step: killing the power to the fan completely. After that, it's a straightforward process of getting into the fan's housing, making a quick map of the existing wires, and then swapping the old switch for the new one.

This simple flow—gather tools, test for power, match the part—is the core of any successful repair. It ensures you’re prepared, you’re safe, and you’re not about to install the wrong component.
Power Down and Verify
First things first: safety. Head over to your home's circuit breaker panel and find the breaker that powers your ceiling fan. Flip it to the "off" position.
Now for the part you absolutely can't skip. Go back to the fan and try turning it on. Tug the pull chain and flip the wall switch. Nothing should happen.
Next, grab your non-contact voltage tester. Touch its tip to the wires you can see inside the switch housing. The tester should stay silent and dark, confirming there is no electrical current. If that thing beeps or lights up, stop immediately and go double-check the breaker panel.
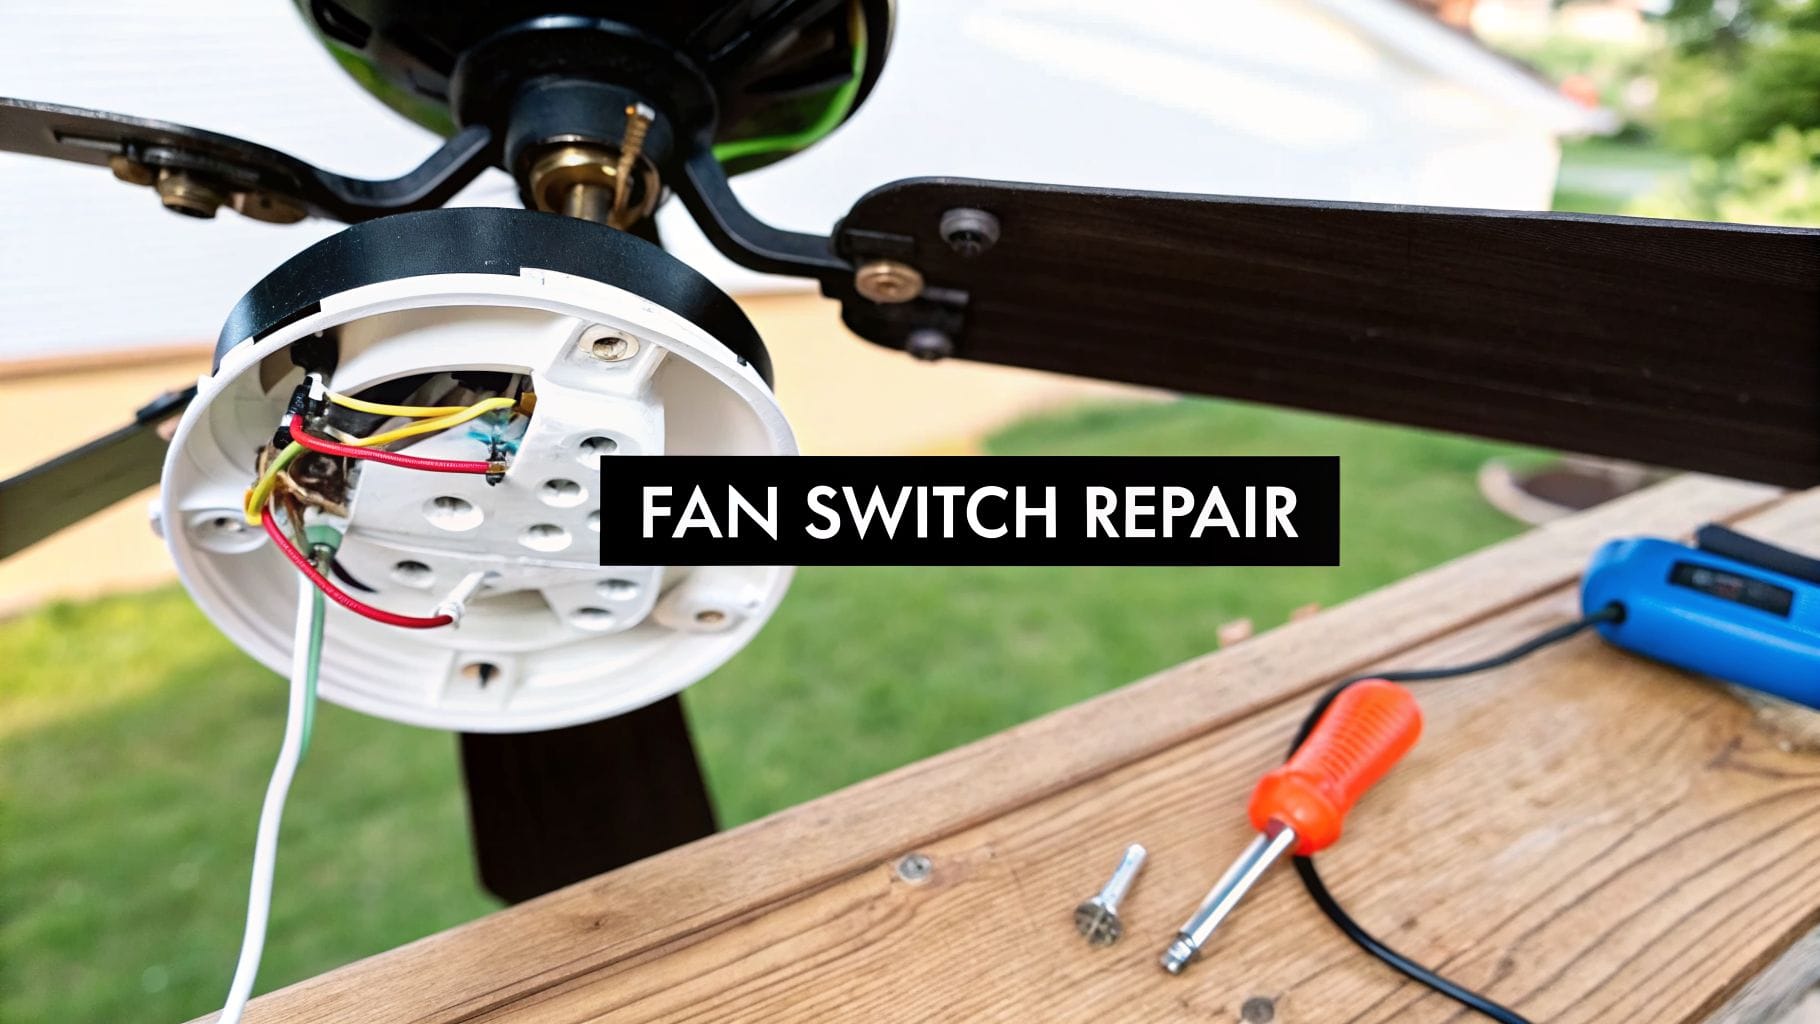
Disassembling the Fan's Switch Housing
With the power confirmed off, you can get to work. Most fans hide the switch inside a central housing or a light kit assembly. You'll need to remove it to get access.
This usually just means taking out a few small screws that hold the housing cover in place. Be careful as you lower it down—it’ll still be connected by a small bundle of wires. Just let it hang gently for a moment.
Document and Disconnect the Old Switch
You should now have a clear view of the old switch and the wires connected to it. Before you touch a single wire, pull out your smartphone.
Pro Tip: Take a clear, well-lit photo of the wiring. Pay attention to which color wire goes into which labeled port on the switch (like the black wire to the "L" terminal). This photo is your roadmap. It takes all the guesswork out of the next step.
Once you have your picture, you can disconnect the old switch. You might be able to simply pull the wires out, or you may need to snip them close to the switch terminals. Once the wires are free, just unscrew the small nut holding the switch in place and pull it out.
Connecting the New Pull Chain Switch
Time to install the new part. You're basically just doing everything you just did, but in reverse.
- Seat the New Switch: Pop the new switch into the housing and tighten it down with its retaining nut.
- Prep the Wires: If you had to snip the old wires, use your wire strippers to expose about a half-inch of fresh copper on each one.
- Wire It Up: Look at your photo and connect the wires to the new switch, one by one. Make sure they’re pushed firmly into the correct terminals. If you're using wire nuts, twist them until the connection is good and snug.
- Give It a Tug: Gently pull on each wire to make sure it's secure. A loose connection is one of the most common reasons for electrical problems.
The ceiling fan repair market is growing, and it's expected to hit USD 5 billion globally by 2035. Switch replacements are a huge driver of this, with residential jobs making up 65% of demand. Those mechanical pull chains often give out after 5-7 years of use, while electronic switches in smart fans account for another 22% of repairs. You can learn more about these market trends and see what’s fueling the growth.
Reassembly and Final Testing
With the new switch wired in, you can put the fan back together. Carefully tuck the wires up into the housing, making sure nothing gets pinched or crimped.
Reattach the switch housing or light kit with the screws you set aside earlier. Make sure it's on there securely.
Now, head back to your breaker panel one last time and flip the breaker back to the "on" position. Go test your work. Pull the chain and cycle through all the fan speeds—low, medium, and high.
If the fan runs smoothly on all settings, you did it! If something isn't working, just kill the power again and double-check your wiring against that photo you took.
When You Should Call a Licensed Electrician
Tackling a DIY ceiling fan repair switch replacement can feel pretty satisfying, but one of the smartest things a homeowner can learn is when to know their limits. A simple switch swap is one thing. But ignoring the real red flags doesn’t just risk a botched job—it can lead to serious electrical hazards.
Let’s be honest: electrical work is no place for guesswork. If you've followed all the steps, put in the new switch, and the fan still won't cooperate, the problem probably runs deeper. You could be looking at a bad fan motor, a faulty capacitor, or an issue hidden in the ceiling wiring.

Unmistakable Signs You Need an Expert
Some situations are way beyond a simple DIY fix. They require the diagnostic tools and experience of a licensed electrician. If you run into any of these, your next move should be a phone call, not another trip to the hardware store.
- You See or Smell Burning: Any sign of scorching, melted plastic on wires, or that distinct electrical burning smell is a huge warning. It means you have a dangerous short circuit that could easily start a fire.
- The Wires Look Old or Damaged: If you open up the housing and find brittle, cracked, or cloth-covered wiring, stop what you're doing. Old wiring, especially the aluminum kind found in homes from the mid-60s to mid-70s, needs a pro’s touch to handle safely.
- The Circuit Breaker Keeps Tripping: Does the breaker trip the second you turn the power back on? You’ve got a short somewhere in the system. Don't just keep resetting it—that’s asking for trouble.
- You Find Complex or Unfamiliar Wiring: If the wires you see don’t match the straightforward black, white, blue, and green pattern, you're likely dealing with a non-standard setup that needs a professional eye to sort out.
A professional diagnosis is crucial in these scenarios. An electrician can trace the problem from the switch to the breaker panel, ensuring the entire circuit is safe and functional, not just the component you replaced.
The Value of Professional Peace of Mind
The choice to call a pro isn't just about safety—it’s about getting a correct, lasting repair. It might feel like an extra cost upfront, but hiring a licensed electrician brings benefits a DIY project just can’t touch.
There’s a reason for this. The global ceiling fan repair services market is projected to climb to USD 4.35 billion by 2033. That growth shows that people understand professionals are the best bet for ensuring safety and avoiding DIY mishaps—like the ones that send over 4,000 Americans to the ER each year from electrical product-related shocks.
When you hire an expert, the work gets done right the first time. They can also spot underlying issues you might miss, like an overloaded circuit that could be a problem for other parts of your home. You can learn more about how our technicians at Black Rhino Electric approach various lighting and fixture installations with an eye for total system safety.
Comparing DIY Risks to Professional Guarantees
Let’s be direct. The real cost of a failed DIY electrical repair isn't a fan that still doesn't work. It’s the risk of electrical shock, fire hazards, and potential damage to your home’s entire electrical system.
| DIY Approach | Professional Service |
|---|---|
| Potential for incorrect wiring or loose connections | Guaranteed correct installation and secure connections |
| Risk of electric shock or creating a fire hazard | Adherence to strict safety protocols and the National Electrical Code |
| No guarantee on the work performed | Workmanship is guaranteed, often with a warranty on parts and labor |
| Might not address the root cause of the failure | Comprehensive diagnostics to identify and fix the actual problem |
Keeping Your Home Cool and Safe
Fixing your own ceiling fan switch can feel like a real win. You get that cool breeze back, and there's a definite sense of accomplishment that comes with tackling a home repair yourself. But whether you handled the ceiling fan repair switch on your own or called in a pro, the most important thing is that the job was done safely and correctly.
Every job that involves wiring has some risk. An incorrectly installed switch isn't just a nuisance that won't turn on the fan; it can be a genuine fire hazard or slowly damage the fan's motor. Knowing when a project is over your head isn't a failure—it's just smart homeownership.
Trusting the Experts for Complex Electrical Needs
If you ran into anything that made you pause—maybe some brittle-looking old wires, a few scorch marks in the electrical box, or a breaker that just kept tripping—calling in a professional is the right move. It’s not admitting defeat; it’s making the safest call for your home and family. Electrical systems are tricky, and sometimes a simple switch problem is just a symptom of something bigger.
At Black Rhino Electric, we believe in arming homeowners with good information, but we always put safety first. Our licensed electricians have the diagnostic tools and years of experience to trace an issue back to its source, ensuring the fix is solid and permanent.
And our team is here for more than just ceiling fan repairs. Think of us as your go-to crew for any electrical project you’ve got on your list.
We handle it all, including:
- Panel Upgrades: Getting your home’s electrical panel ready for modern demands.
- EV Charger Installations: Safely and properly setting up your home to charge an electric vehicle.
- Lighting and Remodels: From swapping out a single fixture to designing the entire lighting plan for your dream kitchen.
- Troubleshooting: Hunting down and fixing those weird electrical gremlins that pop up out of nowhere.
Our team of licensed, local electricians is proud to serve homeowners across Weber, Davis, and Salt Lake counties. You don’t have to tackle a tricky electrical issue or plan a big upgrade on your own.
Common Questions About Ceiling Fan Switches
Even with a detailed guide, it’s normal to have a few questions left about your ceiling fan repair switch, especially when you’re dealing with home wiring. Think of this as an extra layer of support—we'll cover a few specific scenarios that pop up all the time.
Can I Use a 4-Speed Switch to Replace a 3-Speed One?
That's a great question, and I hear it a lot from homeowners who can't find an exact match for their old switch. The short answer is, it's a bad idea.
Here's why: your fan's motor is designed to work with specific capacitor values matched to its original 3-speed switch. Slapping a 4-speed switch in there won't magically give you a new speed. Instead, it’s likely to send the wrong amount of power to the motor windings on each setting.
This mismatch can cause a host of problems you don't want:
- Annoying Humming: The motor might start humming loudly because it’s getting an improper electrical load.
- Overheating: The wrong voltage can cause the motor to overheat—a serious safety risk that can permanently damage the fan.
- Complete Failure: Over time, this incorrect power supply can burn out the motor entirely, turning a simple switch fix into a full fan replacement.
The best practice is always to find a switch with the exact same specs. If you’re having trouble, focus on matching the number of wires and the terminal labels (like L-1-2-3) to ensure you get a safe, compatible replacement.
My Remote-Controlled Fan Isn't Working. Does It Have a Pull Chain Switch?
It really depends on the fan's model. Many modern fans that come with a remote still include a pull chain that acts as a manual override. In these dual-control setups, the pull chain is usually left on the highest speed, and the remote's receiver module then cycles through the different speeds.
So, if your remote suddenly quits, the first thing to check is that pull chain. If yanking it makes the fan work, the problem is almost certainly the remote's batteries or the receiver unit tucked inside the fan's canopy.
However, some of the newest, most integrated "smart" fans have ditched the pull chain completely. In those cases, troubleshooting means checking the remote, the receiver, and sometimes even your home's Wi-Fi.
How Much Does Professional Switch Replacement Cost?
The cost for a professional to handle a ceiling fan repair switch replacement can vary a bit based on your location and how complex the fan is. Here in Northern Utah, you can generally expect a service call to run between $125 and $275.
That price typically covers the electrician's trip, about an hour of labor for diagnostics and the swap, and the part itself. While a DIY repair saves you the labor cost, there are times when hiring a pro is the smartest move you can make.
Hiring a licensed electrician from Black Rhino Electric gives you a few key advantages:
- Safety Assurance: The job is done correctly, eliminating the risk of shock or fire from improper wiring.
- Code Compliance: A pro ensures the repair meets all local and national electrical codes.
- Guaranteed Work: The repair is backed by a guarantee, giving you complete peace of mind.
For fans on really high ceilings, those with complex wiring, or any time you just don't feel 100% confident, that professional fee is a wise investment in your home's safety. For more general questions, you might find answers on our company FAQ page.
At Black Rhino Electric, we believe in empowering homeowners while always putting safety first. If your ceiling fan repair switch project has hit a snag or you just want the assurance of a professional touch, our licensed electricians are here to help. For reliable service you can trust, call us at 385-396-7048 or request a free quote online.