Honestly, realizing your charming old house might have an outdated electrical system can be unsettling. If you're researching how to rewire an old house, you're already asking the right questions about your home's safety and future. It’s an investment not just in repair, but in crucial peace of mind and your property's value.
Contents
- 1 Knowing When to Rewire Your Old House
- 2 Creating Your Rewiring Project Blueprint
- 3 Navigating Common Old House Electrical Hazards
- 4 What to Expect During the Rewiring Process
- 5 Understanding Rewiring Costs and Timelines in Utah
- 6 Why Electrical Rewiring Is Not a DIY Job
- 7 A Few Honest Answers About Rewiring an Old House
Knowing When to Rewire Your Old House
That charming vintage home in your Northern Utah neighborhood is full of character, but what about its electrical system? Let me explain. The reality is that homes built in the 60s, 70s, and even 80s often struggle with today's power demands. They simply weren't designed for a world filled with smart appliances, home offices, and EV chargers.
You know what? Your home might be giving you subtle warnings that its wiring is past its prime. It’s easy to dismiss these as simple quirks, but they are often symptoms of a much deeper, more serious problem that requires attention.
Common Warning Signs of Outdated Wiring
Are your lights flickering every time the air conditioner kicks on? Do you hear a faint buzzing or crackling sound from an outlet? These aren't just minor annoyances; they are red flags signaling that your electrical system is under strain.

Here are some of the most common signs that it's time to consider a rewire:
- Frequently Tripped Breakers: If you’re constantly heading to the electrical panel to reset a breaker, it means your circuits are overloaded. They just can't handle the amount of electricity you're using. Learn more about the role of your breakers and electrical panels in home safety.
- Dimming or Flickering Lights: This often indicates an unstable connection somewhere in the circuit or that a large appliance is drawing more power than the circuit can safely provide.
- Discolored Outlets or Switches: Any sign of scorching, melting, or discoloration around an outlet is an immediate and serious warning of dangerous overheating within the walls. This is one you can't ignore.
- A Persistent Burning Smell: If you notice a faint, persistent burning odor with no obvious source, it could be the plastic insulation on your wiring overheating. This is a critical fire hazard.
- Outdated Outlets: The presence of two-pronged (ungrounded) outlets is a clear sign that your home’s wiring is old and lacks modern safety features.
The Dangers Hiding in Your Walls
Here’s the thing about old wiring—the danger isn't always visible. Imagine buying your dream home in Ogden only to find its electrical system is from the 1960s. Homes over 40 years old frequently have aluminum wiring instead of safer copper, which can degrade and pose serious fire risks.
In fact, outdated electrical systems are a major contributor to house fires in the United States. Issues like overheating and short circuits are silent hazards that can have devastating consequences.
Old House Wiring Risk Assessment Checklist
Use this checklist to quickly identify common symptoms of outdated or dangerous electrical systems in your home.
| Symptom or Sign | Risk Level (Low/Medium/High) | What It Could Mean |
|---|---|---|
| Occasional flickering lights | Low | Could be a loose bulb, but if consistent, points to an overloaded circuit. |
| Frequent circuit breaker trips | Medium | The circuit is consistently overloaded; not enough power for your needs. |
| Two-pronged (ungrounded) outlets | Medium | Lack of a grounding path increases the risk of electric shock and damage to electronics. |
| Aluminum or knob-and-tube wiring | High | Outdated, brittle, and known fire hazards that are uninsurable by many companies. |
| Buzzing sounds or burning smells | High | An immediate sign of a dangerous loose connection or arcing that can cause a fire. |
If you recognize several of these signs, especially those in the "High" risk category, it’s time to stop wondering and start acting. An electrical inspection can give you a definitive answer on the health of your system and a clear path forward.
Creating Your Rewiring Project Blueprint
Deciding to rewire an old house is a big commitment, but honestly, the planning is where you set the stage for a project that’s safe, on budget, and built to last. If you're wondering how to rewire an old house, think of this as your roadmap. It breaks down the critical prep work into real-world steps, so you can have confident, smart conversations with any electrician you talk to.
Let's start by taking a hard look at your home's current electrical system and figuring out what you’ll need down the road. This isn't just about counting outlets; it's about designing a system that works for your family for decades.
Performing Your Initial Electrical Assessment
Before you can plan for the future, you need a crystal-clear picture of what you have right now. Grab a notepad or your phone and do a walkthrough, room by room, documenting the existing setup. Think of it as your fact-finding mission.
Jot down a few key things:
- Outlet and Switch Count: Count every single outlet and light switch. Are you constantly relying on power strips and extension cords? That’s a tell-tale sign you don't have enough.
- Appliance Locations: Make a list of all your major appliances—fridge, dishwasher, microwave, washer, dryer, and so on. These big-ticket items almost always need their own dedicated circuits.
- Lighting Fixtures: Note all the hardwired lights, from ceiling fans to wall sconces. Are there dark corners you’ve always wished had better lighting? Now's the time to plan for it.
- Problem Areas: Keep an eye out for any of those red flags we talked about earlier. Dead outlets, switches that feel warm to the touch, or that one circuit that always seems to trip—write it all down.
This list isn't just for you. It’s gold for an electrician trying to give you an accurate quote later on.
Mapping Your Future Electrical Needs
Now for the fun part—dreaming a little. Don't just plan for how you live today. Think about where you'll be in five, ten, or even twenty years. A full rewire is your chance to future-proof your home.
Ask yourself the important questions:
Are you thinking about adding an electric vehicle (EV) charger? Turning that spare bedroom into a proper home office? What about that hot tub you’ve always wanted out back, or a workshop in the garage? All of these things have specific power demands that need to be planned for now, not later.
Thinking through these scenarios helps us figure out how much capacity your new system really needs, especially when it comes to your main electrical panel. Most older homes get by on 100-amp panels, but a modern lifestyle often demands a 200-amp service to handle everything safely and without a hitch.
Budgeting and Permits in Northern Utah
Here’s the thing about a project this size: you have to be realistic about the budget, and you can’t skip the permits. The cost to rewire a house varies, but you can generally expect it to fall somewhere between $2 to $4 per square foot. A few key factors will move that number up or down.
This table breaks down what really impacts your project’s bottom line.
| Cost Factor | Why It Matters | Potential Budget Impact |
|---|---|---|
| Home Size & Age | Larger, older homes simply need more materials and labor. Old-school construction, like thick plaster walls, is a lot tougher to work through than modern drywall. | Significant |
| Wiring Accessibility | If you have an accessible attic and crawlspace, the job is often cheaper. When we have to start cutting into finished walls, the labor costs go up. | Moderate |
| Panel Upgrade | Moving from a 100-amp to a 200-amp service is a common and necessary expense for modern homes, typically adding $1,500-$3,000 to the total cost. | Significant |
| Local Permits | Getting permits is a legal must in Weber, Davis, and Salt Lake counties. It’s your guarantee that the work gets inspected for safety and code compliance. | Minor (but essential) |
Speaking of permits, they're your best friend on a job like this. In Northern Utah, every city and county requires a permit for a full house rewire. This ensures a neutral, third-party inspector signs off on the work, verifying it meets the National Electrical Code (NEC). It’s a non-negotiable step for your safety, your homeowner's insurance, and your home’s future resale value. Don't ever let anyone talk you out of it.
Old houses have character. They also have electrical quirks—and some of them are serious hazards hiding right behind the drywall. When you're tackling a rewire, you have to know what you might find. This isn't just about spotting problems; it's about understanding why modern safety codes exist and how to protect your home.
Honestly, some of the wiring methods used decades ago just can't keep up with modern life. They were installed before we had microwaves, computers, and EV chargers. They lack the basic safety features we take for granted today and can become genuine fire risks as they age.
The Dangers of Knob-and-Tube Wiring
If your home was built before the 1950s, there's a good chance you'll find knob-and-tube (K&T) wiring. This was the original stuff: ceramic knobs held wires suspended in open air, and ceramic tubes protected them where they passed through wood joists. It was clever for its time, but by today's standards, it has critical flaws.
- No Ground Wire: This is the biggest issue. A ground wire is a non-negotiable safety feature that protects you from shock and your electronics from damage. K&T has no ground path. Zero.
- Brittle Insulation: The rubberized cloth insulation on these wires has a 60- to 100-year lifespan. After that, it becomes incredibly brittle, cracking and flaking away. This can leave live, uninsulated wires exposed inside your walls.
- Heat Issues: K&T wiring was designed to dissipate heat into open air. When modern insulation gets blown into wall cavities or attics, it smothers the wires, creating a major fire hazard. Many insurance companies won't even cover a home with active K&T for this very reason.
The Problem with Aluminum Wiring
From the mid-1960s to the early 1970s, a copper shortage made aluminum wiring a popular substitute. The problem? Aluminum expands and contracts at a different rate than copper when it heats up and cools down. This constant movement can cause connections at outlets, switches, and junction boxes to work themselves loose over time.
A loose connection is a recipe for arcing—tiny sparks jumping across the gap. That arcing creates intense heat and is one of the leading causes of electrical fires. Having aluminum wiring doesn't automatically mean your house is in danger, but it absolutely means every single connection point needs to be inspected and made safe with specialized, approved methods.
Expert Insight: The U.S. Consumer Product Safety Commission (CPSC) reports that homes with aluminum wiring manufactured before 1972 are 55 times more likely to have one or more connections reach "Fire Hazard Conditions" than homes wired with copper.
Ungrounded Outlets and Overloaded Circuits
Even if your home dodged K&T and aluminum wiring, other dangers can linger. Two-prong, ungrounded outlets are a common sight in older houses. They’re missing that third hole for the ground pin, which means there’s no safe path for stray electricity to go. This increases the risk of shock and can fry sensitive electronics.
Overloaded circuits are another constant battle. Rewiring isn’t just about safety—it’s about giving your home enough power for 21st-century living. Homes built before 1980, common in Northern Utah's historic neighborhoods, often lack the GFCI outlets that have been required since the 1970s, making kitchens and bathrooms particularly hazardous. While standard copper wiring can last 50-70 years, the effective lifespan of aluminum or K&T can be as short as 30-40 years before the risks of overloads and outages become too great. If any of this sounds familiar, the only way to know for sure what's going on is with a professional evaluation. Our experienced team offers electrical troubleshooting services to pinpoint these exact kinds of hidden dangers and map out a safe path forward.
What to Expect During the Rewiring Process
So, you’re committed to the project. You're ready to move forward. What does figuring out how to rewire old house electrical systems actually look like, day-to-day? Honestly, it’s often much less disruptive than people imagine, especially when handled by an experienced crew that knows how to manage the workflow.
Let me explain. A full rewire isn't just about yanking out old wires. It’s a systematic process designed to give you a modern, reliable electrical system with minimal impact on your daily life. Think of it as a foundational upgrade for your home's safety and future.
The Day-to-Day Workflow
A professional rewiring project isn't chaos; it's a carefully planned operation. The whole thing usually lasts between 3 to 10 days, depending on your home’s size and the job's complexity. We break it down into phases to keep your home as livable as possible.
Here’s a typical flow of what happens once our team is on-site:
- Securing the Workspace: First things first, we prep. Our electricians lay down protective coverings on floors and furniture in the work areas. The goal is to contain dust and debris from the get-go.
- Systematic Power Shutdown: We don’t just kill all the power and leave you in the dark. We work circuit by circuit, de-energizing only the specific areas we’re working on at that moment. This means you’ll still have power in essential spots like the kitchen and bathrooms for most of the project.
- Opening Walls with Precision: Here’s the thing—we have to get into the walls. But a skilled electrician makes small, precise cuts in the drywall or plaster, placed strategically to minimize the repair work later. It’s a surgical approach, not a demolition.
- Running New Wires: This is the core of the project. We remove the old, hazardous wiring and run new, high-quality copper wiring (typically NM-B Romex) from the panel to every outlet, switch, and fixture. We follow modern codes, which means installing outlets every 12 feet of wall space, so you can ditch the extension cords.
- Installing Modern Components: Finally, we install new, secure electrical boxes, switches, and outlets. This is also when we'll add any planned upgrades to the system.
To understand why this is so important, it helps to see what we're replacing. This visual highlights the key hazards we’re trained to eliminate.
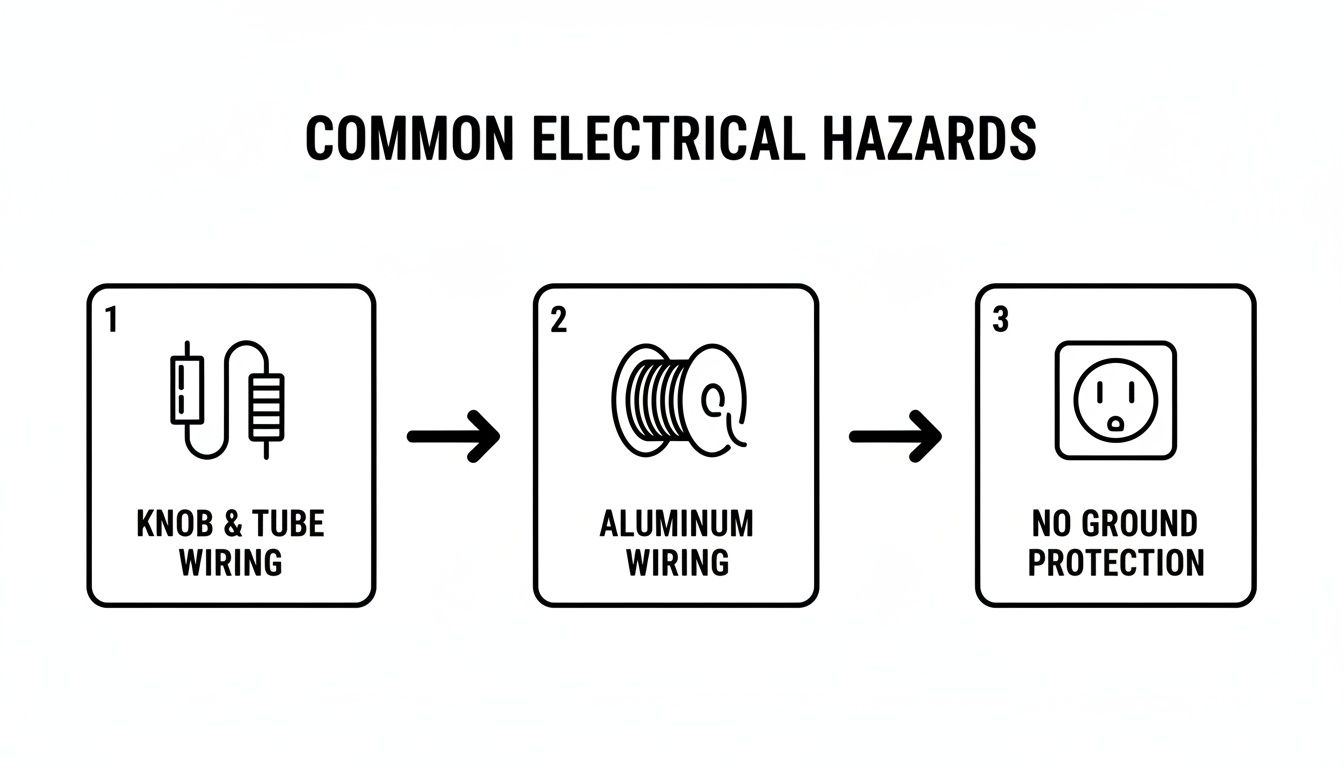
This shows the evolution from outdated, risky systems like knob-and-tube to the safer, grounded standards required today.
Integrating Modern Safety and Convenience
You know what? A rewire is the perfect opportunity to bring your home’s electrical system fully into the 21st century. It’s not just about replacing what’s there; it’s about upgrading for how we live today. This is the moment to build in the features that will serve you for decades.
A rewire isn't just a repair; it's a comprehensive upgrade. It’s your one chance to integrate life-saving technology and future-proof your home for modern electrical demands, from smart devices to electric vehicles.
During the process, we can easily incorporate several crucial upgrades that significantly boost your home’s safety and convenience.
This table breaks down some of the most common and impactful upgrades we integrate during a rewire.
| Modern Upgrade | Why It's Essential | Real-World Benefit |
|---|---|---|
| GFCI Protection | Ground Fault Circuit Interrupters are code-required near water (kitchens, bathrooms, garages). They prevent shock by shutting off power instantly if a ground fault is detected. | Protects your family from severe electrical shock when using appliances near sinks or in damp locations. |
| AFCI Protection | Arc-Fault Circuit Interrupters detect dangerous arcing in wiring—a leading cause of electrical fires. They're now required in most living areas. | Prevents fires caused by damaged cords, loose connections, or old wiring hidden within your walls. |
| Dedicated Circuits | These are for high-draw appliances like microwaves, refrigerators, or EV chargers, preventing them from overloading shared circuits. | Allows you to run your microwave and coffee maker at the same time without tripping a breaker. |
| Smart Home Wiring | We can run additional low-voltage wiring (like Cat6) to prepare your home for smart thermostats, security cameras, and integrated lighting systems. | Ensures your home is ready for future technology without needing to open up the walls again later. |
A whole-home rewire is an investment, but it's one that pays dividends in safety, reliability, and peace of mind. By understanding the process, you can feel confident and prepared for the project ahead.
Understanding Rewiring Costs and Timelines in Utah
Let's get right to it. When you're staring down a project as big as a full home rewire, two questions jump to the front of the line: "How much is this going to cost?" and "How long will my house be torn up?" If you're figuring out how to tackle the wiring in an older home here in Northern Utah, you deserve straight answers, not vague hand-waving.
Honestly, the cost can swing a bit, but most projects land in a pretty predictable ballpark. For a complete rewire in places like Weber, Davis, and Salt Lake counties, homeowners should plan on investing somewhere between $2 to $4 per square foot. That price covers both the quality materials we insist on and the expert labor it takes to do the job safely and correctly.
What Factors Influence the Final Quote?
So, why the range? Every house has its own story, and a few key details will shape the final quote. It’s never just about the square footage; it’s about the complexity of the work itself.
Here’s the thing—the age and bones of your home play a huge part.
- Wall Accessibility: Got an open attic or an easy-to-access crawlspace? Fantastic. That makes our job of running new wire much simpler and can help keep labor costs down. But if we're dealing with thick plaster walls or tight spaces with no clear path, it means more careful cutting and patching, which adds time and budget.
- Type of Old Wiring: Yea, there's a big difference. Pulling out old, brittle knob-and-tube or hazardous aluminum wiring is a much more delicate and labor-intensive process than just replacing outdated copper wiring. What we find behind the walls directly impacts the scope of the job.
- Electrical Panel and Service Upgrades: This is a big one. If your current electrical panel is already stuffed to the gills or underpowered for modern life (a classic issue in older homes), a panel upgrade to 200-amp service is almost always part of the conversation. It’s a critical piece of the puzzle to ensure your shiny new system can actually handle everything you plug into it.
The Investment That Pays You Back
A full rewire isn't just another home expense; it's a serious investment in your property. Think about it from a buyer's perspective. An updated electrical system is a massive selling point that completely erases a major red flag during a home inspection. It tells them the home is safe, up to code, and ready for the next 50 years.
This isn't just about safety for your family today—it's about boosting your home's marketability and value for tomorrow. On top of that, many homeowner's insurance companies offer lower premiums for houses with modern wiring because the risk of an electrical fire plummets.
This is an upgrade that can literally pay for itself through increased property value and potential insurance savings.
Realistic Timelines for a Smoother Project
I get it—the thought of disruption is a major concern. But you know what? A well-planned rewire is often faster and less intrusive than people imagine. For a typical medium-sized home here in Northern Utah, a complete rewire usually takes between 5 to 10 working days.
Of course, larger homes or houses with tricky structural issues might take a bit longer, but a professional electrician will always walk you through a clear, realistic timeline before a single tool comes out. This lets you plan your life and keeps the impact on your family to a minimum.
Estimated Rewiring Costs for Northern Utah Homes
The table below offers a general guide for what a full rewire might cost in areas like Weber, Davis, and Salt Lake counties. Remember, these are estimates, and a detailed quote will depend on the unique factors of your home.
| Home Size (Sq. Ft.) | Estimated Cost Range | Estimated Timeline | Key Factors |
|---|---|---|---|
| Up to 1,500 sq. ft. | $3,000 – $6,000 | 3–5 Days | Good accessibility, simple layout, minimal wall repair needed. |
| 1,500–3,000 sq. ft. | $6,000 – $12,000 | 5–10 Days | Standard project, may require a panel upgrade to handle modern loads. |
| Over 3,000 sq. ft. | $12,000+ | 10+ Days | Complex layout, multiple stories, extensive upgrades likely needed. |
Having these details helps you budget and plan for this essential home improvement without any surprises. For a precise quote that's tailored specifically to your home, the next step is easy. You can request a personalized estimate from our team and we'll break it all down for you.
Why Electrical Rewiring Is Not a DIY Job
Knowing how to rewire an old house is one thing, but actually doing it? That’s where you draw a hard line. This is the one project where a DIY approach can have absolutely devastating consequences.
Let me be blunt: the stakes are just too high. Unlike tiling a bathroom or painting a room, a single mistake with wiring—a nick in the insulation, an improper connection—creates a hidden fire hazard inside your walls. You might not know it’s there until it's far too late. The U.S. Fire Administration points to tens of thousands of home fires every year caused by electrical failures, and a shocking number of those trace back to faulty installations. The risk of electrocution is just as real and just as severe.

The Professional Difference: Safety, Code, and Peace of Mind
Here’s what you’re really paying for when you hire a licensed, insured professional: expertise, safety, and accountability. It’s not just about labor. A pro understands the dense and ever-changing National Electrical Code (NEC) and all the local amendments we have here in Northern Utah that govern every single aspect of a rewire.
I’ve seen it happen. A homeowner attempts a DIY rewire, only to fail the inspection. This can derail a home sale, void your homeowner's insurance, and force you to pay a professional to rip out all the incorrect work and start from scratch. It's a costly, frustrating mistake you don't want to make.
Choosing a professional ensures the job is done right the first time. It’s about protecting your family and your biggest investment. It's about more than just getting the power on; it’s about lasting safety and security.
A Few Honest Answers About Rewiring an Old House
We get it. A full rewire feels like a massive project, and you’ve got questions—about the mess, the cost, and whether it’s even worth it. If you're looking into how to rewire old house electrical systems, you deserve straightforward answers. Here’s what we tell homeowners in Northern Utah when they ask us these common questions.
Can I Live in My House During the Rewire?
Absolutely. A professional crew doesn’t just tear everything apart at once. We work methodically, often one section or even one room at a time, to keep your life as normal as possible.
We’ll map out a plan to make sure you always have power where you need it most—like the kitchen and bathrooms—throughout the entire process.
Will My Walls Be Destroyed?
Honestly, our goal is to be surgeons, not demolition experts. While some small cuts are unavoidable to pull new wires, we use modern techniques and tools to keep them minimal.
We’re experts at fishing wires through wall cavities with the smallest possible openings. This means less mess, easier patching, and preserving the character of your older home.
The goal is always surgical precision, not demolition. A skilled electrician knows how to fish wires through wall cavities with minimal intrusion, protecting the character of your older home.
Does Rewiring Actually Add Value to My Home?
Yes, and in a big way. A complete, permitted electrical upgrade is a huge selling point. It erases a major red flag for home inspectors and potential buyers, which can make or break a sale.
On top of that, it can lower your homeowner's insurance premiums and gives everyone—including you—peace of mind knowing the home is safe and compliant with modern electrical codes. It’s an investment in safety that pays off.
How Do I Know an Electrician Is Qualified for This Job?
This is a critical question. You’re not just looking for any electrician; you need someone with specific, verifiable experience in older Northern Utah homes.
Here’s what to check for:
- License and Insurance: Non-negotiable. It protects you and them.
- Local Experience: Ask for references from similar-aged homes in your area.
- Permitting: Ensure they pull all necessary permits. This is the ultimate sign they do things the right way and are committed to code-compliant, safe work.
When you're ready to make sure your home’s electrical system is safe, reliable, and ready for the future, trust the local experts at Black Rhino Electric. Give us a call at 385-396-7048 or request a free quote online to talk through your project with our experienced team.