Flickering lights, a dead outlet, a breaker that just won’t stay on—sound familiar? Every homeowner has faced that moment of frustration, but effective electrical troubleshooting is about more than just convenience; it’s a critical skill for ensuring your home’s safety. This guide will walk you through the essentials, from identifying common issues to knowing when it’s time to call in the experts.
Contents
Why Electrical Troubleshooting Matters for Your Home’s Safety
When an outlet stops working or a circuit breaker trips repeatedly, you’re facing an electrical problem. Electrical troubleshooting is the process of systematically identifying and resolving these issues, a skill that saves time, money, and prevents hazards like electrical fires.
Here’s what you need to know:
- Safety First: Always turn off power at the breaker before inspecting or working on any circuit.
- Common Issues: Most problems are overloaded circuits, short circuits, ground faults, open circuits, or component failures.
- Basic Process: Identify the problem’s scope, isolate the circuit, test components, and know when to call a professional.
- When to Stop: Burning smells, shocks, or sparks require immediate professional help.
The stakes are real. Electrical issues account for about 10% of all reported home fires, with many stemming from faulty or outdated wiring. The good news? Knowing how to troubleshoot basic issues can prevent a significant number of these failures.
You know what? It’s understandable to feel intimidated by electrical work. But understanding the fundamentals doesn’t mean you have to fix everything yourself. It means you can spot problems early and communicate clearly with professionals, making informed decisions about your home’s electrical health, whether you’re in Ogden, Layton, or Salt Lake City.
Let me explain: our goal isn’t to turn you into an electrician, but to give you the confidence to handle minor issues safely and the wisdom to recognize when professional expertise is necessary.

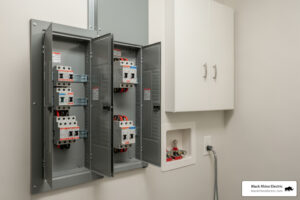
Foundations: Safety, Tools, and Common Issues

Before diagnosing electrical woes, it’s crucial to build a foundation of safety, tools, and knowledge of common problems.
Safety First: The Golden Rules of Electrical Work
When it comes to electricity, safety is non-negotiable. The single most important rule of electrical troubleshooting is to always turn off the power at the main electrical panel before you begin. For added safety, use a lockout/tagout device to prevent someone from accidentally re-energizing the circuit.
Proper personal protective equipment (PPE) is also essential:
- Insulated gloves: Protect your hands from shock.
- Safety glasses: Shield your eyes from sparks or debris.
- Insulated tools: Use screwdrivers and pliers with insulated handles.
Honestly, if you ever feel uncomfortable, stop and call a professional. Electrical fires account for roughly 10% of all reported home fires, and many are preventable. Learn more about proactive safety in our guide, Electrical Maintenance 101: Everything You Need to Know.
Your Essential Toolkit for Basic Electrical Troubleshooting

A few key tools can make all the difference in safely diagnosing common issues:
- Non-Contact Voltage Tester: Safely detects voltage without touching bare wires, perfect for confirming a circuit is off.
- Digital Multimeter (DMM): A versatile tool that measures voltage, current, and resistance. It’s invaluable for checking continuity and exact voltage.
- Insulated Screwdrivers: A set of flathead and Phillips screwdrivers with insulated handles for safety.
- Wire Strippers/Cutters: For safely stripping or cutting wires.
- Needle-Nose Pliers: Useful for bending wires and working in tight spaces.
- Outlet/Receptacle Tester: A simple plug-in device that indicates if an outlet is wired correctly.
Identifying Common Culprits: From Overloads to Short Circuits
Understanding the symptoms of common electrical problems is the first step in effective electrical troubleshooting.
- Flickering Lights: Often a sign of a loose connection or an overloaded circuit. Learn more in our guide on How to Fix Flickering Lights.
- Dead Outlets or Switches: Could be a tripped breaker, a tripped GFCI outlet, or a loose connection. We have a helpful guide on How to Fix Outlet Not Working.
- Tripped Breakers: These safety devices cut power during an overload or fault. They can be caused by:
- Overloaded Circuits: Too many devices drawing power from one circuit.
- Short Circuits: A “hot” wire touches a neutral or ground wire, causing a current surge that trips the breaker instantly.
- Ground Faults: A hot wire touches a grounded part of an appliance or box. GFCI outlets are designed to detect this and prevent shock.
- Open Circuits: A break in the electrical path (like a loose wire or faulty switch) prevents current from flowing, so a device won’t receive power.
A Step-by-Step Guide to DIY Electrical Troubleshooting
Now that you know the basics, let’s talk strategy. Approaching electrical troubleshooting systematically is like being a detective—you gather clues, eliminate possibilities, and narrow down the suspect.
The Systematic Approach to Electrical Troubleshooting
A methodical approach will save you time and keep you safe.
- Identify the Scope: Is the problem in one outlet, an entire room, or the whole house? This helps narrow the search.
- Gather Information: What happened when the problem occurred? Did you plug something in? Did you smell or hear anything unusual?
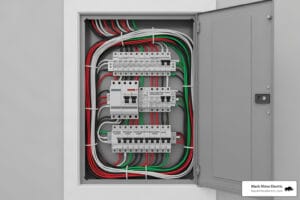
- Check the Breaker Panel: Look for a tripped breaker. Flip it firmly to “off,” then back to “on.” If it trips again immediately, you have a persistent fault.
- Isolate the Problem: If a breaker keeps tripping, unplug everything on that circuit. If the breaker holds, plug devices back in one by one to find the culprit. If it still trips with nothing plugged in, the issue is in the wiring.
- Follow the Flow of Current (The Hopscotch Method): Use a non-contact voltage tester to check for power along the circuit, from the breaker to each outlet and switch. When you find a point where power stops, you’ve isolated the problem area. This is easier with wiring diagrams, which act as a blueprint for your system.
- Test Components: Once you’ve narrowed down the area, you can test individual outlets or switches.
This systematic approach is key to accurate troubleshooting. For more, explore this external resource on Troubleshooting Fundamentals.
Practical Tests for Common Components and Issues
Once you’ve isolated the problem area, it’s time for specific tests. Always ensure the power is off before touching any wires.
- Testing Outlets and Switches:
- Use a simple outlet tester to check for power and correct wiring.
- If a GFCI outlet isn’t working, press the “TEST” and then “RESET” buttons. If it won’t reset, there may be a ground fault.
- With a multimeter, you can check for voltage (power on, with caution) or test for continuity in a switch (power off).
- Testing Capacitors: Found in appliances like AC units, a failing capacitor can prevent a motor from starting. Safety First: Capacitors can hold a dangerous charge even when off. Always discharge them safely before testing. A multimeter can check if the capacitor’s reading is within 10% of its rated value.
- Diagnosing Intermittent Faults (The “Wiggle Test”): For problems that come and go, gently wiggle wires and plugs (with caution) to see if you can trigger the fault, revealing a loose connection. You can also listen for buzzing or crackling sounds from outlets, which indicate a dangerous arcing condition.
When to Call a Pro and How to Prevent Future Headaches
While basic electrical troubleshooting is empowering, knowing your limits is crucial for safety. Recognizing when to call a licensed electrician isn’t just about convenience; it’s about protecting your home and family.
Know Your Limits: Signs You Need a Professional Electrician
We want homeowners in Ogden, Roy, and throughout Weber County to be informed, but we also want you to be safe. Here are the red flags that mean it’s time to call a professional:
- Burning Smells: Any burning odor from outlets, switches, or your panel is a serious fire hazard. Turn off the main breaker and call for help.
- Frequent Breaker Trips: If a breaker trips repeatedly, especially right after being reset, it signals a persistent fault that needs professional diagnosis.
- Electrical Shocks: Even a mild shock from an appliance or outlet indicates a dangerous current leak.
- Sparks or Buzzing: Large sparks or a continuous buzzing sound from outlets, switches, or your panel points to a serious fault.
- Warm or Hot Outlets: If an outlet or switch plate is warm to the touch, it’s overheating and poses a fire risk.
- Outdated or Aluminum Wiring: Homes in areas like Layton or Riverdale with older wiring, especially aluminum, require an expert to assess and upgrade for safety and code compliance.
- Water Damage: Never touch electrical components that have been exposed to water.
- Complex Repairs: Any work inside your main panel, adding new circuits, or whole-home rewiring requires a licensed electrician.
Attempting complex repairs can lead to thousands in damages or injury. For more on emergencies, see our Top 10 Signs You Need an Emergency Electrician.
Preventive Measures: Avoiding Future Headaches
Proactive steps can significantly reduce your need for reactive electrical troubleshooting.
- Annual Electrical Inspections: Have a licensed electrician check your system to identify potential issues early. This can prevent up to 90% of electrical failures.
- Know Component Lifespans: Circuit breakers last 30-40 years, while outlets last 10-20. Plan for proactive replacements, especially in older homes.
- Don’t Overload Circuits: Distribute high-wattage appliances across different circuits to prevent tripped breakers.
- Use Surge Protectors: Protect sensitive electronics from power surges.
- Inspect Cords and Plugs: Regularly check for fraying or damage and replace any faulty cords.
- Educate Your Family: Ensure everyone knows basic electrical safety and what to do if they spot a warning sign.
- Upgrade Outdated Systems: If your home in Syracuse or Clearfield has dimming lights or can’t keep up with modern electrical demands, it may be time for a panel replacement or wiring upgrade.
While tackling minor electrical issues can be empowering, your safety is always the top priority. Understanding the basics of troubleshooting helps you make informed decisions, but for complex or dangerous problems, the expertise of a qualified professional is invaluable. For reliable and safe solutions in Ogden and Weber County, trust a licensed expert troubleshooting electrician to get the job done right. If you’re facing an issue you can’t solve or simply want a professional assessment, don’t hesitate to call us at 801-810-4292 or Request a Free Quote online today.